Wednesday, December 2, 2009

Deck the Halls (Dollar Store Style!)

Sorry it has been over two weeks since my last post. Church commitments and a trip home to Arkansas for the holiday filled me weeks! But I am back with a few samples of what else I have been up to lately. I have really been trying to reuse and re-purpose items this last year...like my grandmommie's vintage jewelry and my summer mailbox decoration. My Christmas decorations are no exception!

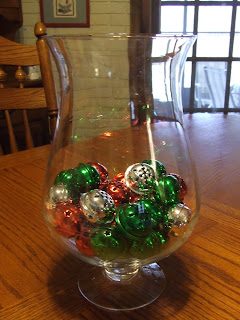
I have never been pleased with my dining room centerpiece and have tried several different styles. Our dining room opens to the kitchen, so it needs to be casual. Also, it is our only table upstairs and is used at every meal, with two children, so it must also be easy to move around. This only cost $4 and I am SOOO pleased! I saw the idea for a pottery barn rip-off here.

This is my creation, using my glass container from Halloween (which was purchased on sale several years ago at a discount decorating store.) I picked up 4 packs of bells, but might stop in for just one more. They also have brassy gold and a pewter-like finish but I am a traditional red/green gal.
My next little project involved two 10 inch wreaths from the Dollar Tree. I used some leftover adhesive red felt letters to spell out "peace" and "joy" on a scrap of brown lunch sack. I then added a few of those cheap apple ornaments ($2 for a dozen) that I found left in the basement from my teaching days. I used to personalize one for each student as a part of a Christmas gift from me. I did have to pick up a spool of ribbon, but it was only $1 and I have some left for other projects. The little mini-cookie cutters were a gift; I think I might tie them on with a little solid red ribbon because they don't show as well as I would like. If I get really ambitious, Miss M and I will try those applesauce/cinnamon ornaments with the cutters....that would be so cute in the kitchen and smell good too!Anyway, 3o minutes and $4 later (plus the things I already had) and I have a sweet little decoration for the kitchen windows.

I have a few other little things to show you, but it is dark and rainy here..calling for flurries....so my pictures are all turning out too dark. I will leave you with one little photo of Miss M and some children from school though....
About 70 children earned a hummer ride to Incredible Pizza on Monday. Mr C and I were able to go too! Miss M said she felt like Hannah Montana! Check back soon and I will show a simple and whimsical front door decoration.

Tuesday, November 17, 2009

Thanksgiving Banner


I saw this cute banner over at Magnolia Manor and decided to try my hand at it. All it took was
  • a few sheets of scrapbook paper
  • one package of stickers
  • ribbon I had on hand
  • a few cuts using a borrowed Ellison machine. If you don't have access to a die-cut machine, you could always free hand your letters or just print, trace, and cut them out.
  • glue (I used glue dots.)
  • mini-clothespins
This should be easy to store - just unclip the cards and place in a ziplock with the ribbon and clothespins.
The inspiration banner used only the word thankful and I think that less letters would have been better than the longer version I created. I scored several sheets of scrapbooking paper, ribbon and stickers ALL at 50% off today at Hobby Lobby! To really make my money go even further, I am planning to use the same ribbon for several banners. The little rolls in the scrapbook supply aisle are the perfect length for shorter banners. They were only 50 cents today! I am already thinking about making one for several other seasons.....
"JOY" for December
"SNOW" for January
"LOVE" for Valentine's Day
"SPRING" or He is Risen" for April, depending on Easter falls.
"USA or AMERICA" could be used for several holidays.
Lots of possibilities, don't you think? I also forgot to mention that I was the winner of a contest sponsored by whiMSy love's etsy store. I used a portion of my gift certificate to purchase a special custom mini-banner that is so cute and cheery. (It says "celebrate") She is in the process of moving to another state right now, but you can contact her about purchasing a similar one here. Banners can take so many forms, but it is easy to get a ton of decorating bang for your buck. Have fun and let me know what you create.

Monday, November 16, 2009

Totally 100% Free Holiday Tip

Looking for a TOTALLY free holiday spirit idea that works for any special day? It's genius I tell you and totally cute if you have young children who speak clearly. Simply change the outgoing message on your phone. Last fall, the wee ones and I started switching ours up to coordinate with holidays and seasons. For our summer message "It's summer and we are probably working in the garden. Please leave a message" all Mr C got to say was "bye!".
In October, he graduated to saying "Happy Halloween" after Miss M leaves her bit. (You have reached the _______ family; no tricks and no treats - just leave a message.) This month he got to add "Happy Thanksgiving" after Miss M's introduction.
It only took about 5 takes to get it just perfect, except for the happy squeals you can overhear at the end because "we nailed it that time Mama".
One little suggestion: If your little ones can't or won't speak clearly, do your friends and family a favor and do not use this idea. As the coordinator of my MOPS group, I call lots of preschool families. If I am calling you for the first time, I want to hear either the name or number clearly so I know I am leaving a message at the right place! Have fun and let me know what messages you come up with! Gotta run now....it is a dark and rainy in my city today - a perfect day for baking pumpkin/chocolate chip muffins!

Sunday, November 8, 2009

Repurposed/Thrifted Purse

Miss M had a birthday party to attend today and I was excited to use this cute little purse I got at Salvation Army over the summer for a mere 25 cents to make a present for the birthday girl! This project used:
  • 25 cent, like new purse
  • ribbon left from another project
  • 2 odd buttons
  • two coordinating fabrics, one left from Miss M's Easter basket several years ago and the second found in my grandmother's scrap stash. You might remember it from the napkin rings at Miss M's 6th birthday tea party.
  • iron on fusible web There are several brand names. I used a package of "Wonder-Under" which is at least 20 years old because my mom still had it in her craft closet from several projects in years past. Namely, Christmas sweatshirts we thought were awesome at the time....they were awesome, just in the 90's, not today! Sorry I don't have any pics of them!
My camera batteries were dead, so I don't have pictures of the process, but just trace out your pattern on the paper side of the fusible web and then follow the manufacturer's directions on how to adhere it to your fabric and later to your project.

25 cent bag...cute but boring

I glammed it up with a cupcake pattern and a red button for the cherry. For a larger project, I might have used additional buttons for the sprinkles, but I didn't have enough that were small enough for this bag.
It still needed a little more, so I added the bow and hand-stitched a modified blanket stitch around the cupcake edge. I doubled pink thread, but would have used embroidery thread if I had it!
Miss M received several lip glosses and nail polishes for her birthday from various people, so we didn't open all of them and instead put a few in this cute little bag. All total, this gift was technically only 25 cents because I had all the other supplies on hand! I am so pleased with how this project turned out, I am on the lookout for other bags/totes/purses. If you like this idea, check out my buddy at whiMSy-love for my inspiration project. She used some of those promotional bags vendors give out....so cute and totally FREE!! we both did a little handstitching on our projects, but you could just use fabric glue and the fusible web. I am not a seamstress AT ALL....if you can sew a button you can do this!

Wednesday, November 4, 2009

Fun Fall Frolics

Things are beginning to settle down in our home, now that October is over. It always seems like November is a time to recharge after the craziness of October and before the really hectic month of December begins. I will give you a little clue as to how to retain your sanity in December though - do what is important to your family THIS year. Don't worry about what you have always done in the past. I love traditions, but sometimes we keep them going past their prime. Besides, if you don't let go of past traditions there isn't room for new ones. With that being said, here are a few things that have been keeping us busy lately...
The weather and illness kept us from making our yearly visit to a local apple orchard, but we were still able to to squeeze in a trip to the pumpkin patch...
Mr C enjoying a ride on the horse swing
They both LOVED the tightrope this year
Miss M was brave enough to try the zip line again, and again and again! Mr C said "that's enough" after just one turn.I got to explore the tunnels with both wee ones this year. We made it up and through the biggest one...and I think my back is permanently stooped now from bending over. Mr C could clear all the braces and took off several times WITH the flashlight!

Big sliding fun
Through the fields on our tractor ride
Our final selection
Cupcake Daddy got in on the jack-o-lantern action this year...his Frankenstein interpretation.
I tried a new recipe for roasted pumpkin seeds this year - sugar and spice. I really like them better than the traditional salted variety. The recipe says "additional sugar, to taste". I added a lot of sugar for my taste! I also made a few caramel apples as well. A little apple smile (peanut butter with marshmallow teeth) makes a fun and healthy snack.
And finally, Halloween costumes! We made Miss M's mermaid outfit from Family Fun Magazine. Click here to see how we did it. Mr C wanted to be Kobe Bryant - his own idea! Never mind he had a great Lightening McQueen costume in his closet. Thankfully, he didn't notice that he looks nothing like Kobe and that his "costume" was entirely the wrong colors.You can't see his bag, but they both have matching stamped treat bags we made a few years ago.

Saturday, October 31, 2009

Miss M's Art Show

I know some of you family members are wanting to see Halloween pictures, but you will just have to wait a little longer! Miss M has a piece of artwork featured in a "real-life artist" gallery in our city. Her work, along with about 150 other pieces, was selected to be in a special children's exhibit of works in grades K-8, all from her school district. The opening is next Sunday, but took the visiting grandparents over for a peek this morning.
If you are local, you should go check it out. (Let me know if you want the name of the gallery.) It is housed in a very old building with art in all kinds of mediums. There are also artists at work on some days....we plan to check it out again soon! They were setting up for an event of some kind today - what a great space that will look magical tonight!
works from some talented young artists....

Miss M really liked the burger and gumball guitar.

Tuesday, October 27, 2009

Vintage Tea Table

Each fall, the ladies ministry at my church holds an annual "Celebration Tea". Women in the church volunteer to host tables, which entails decorating a table for eight in any theme. The food committee provides the tea and treats which are both beautiful and delicious. The menu this year included:
  • bowtie pasta salad in Parmesan cones
  • herbed chicken salad sandwiches with cranberry peach chutney
  • oven roasted shrimp on cornmeal scones with balsamic roasted tomato salsa
  • ranch cream cheese baby carrots
  • chocolate dipped chocolate mousse Oreos
  • peach blueberry cheesecake bars
  • orange praline pecans

YUM!!! Comment or email if you want any of the recipes.

Every year, there are several fall and Christmas tables. I personally have created an Americana table (the year my brother served in Iraq), a bird table (using and in honor of my grandmommie's bird collection), a Valentine table (my b-day is Feb 11), and a vintage table. I have actually done this theme twice, but this year was my favorite.

Cupcake Nana helped me secure some of these items. Lots of ladies stopped by to say their mother/grandmother (and sometimes themselves) wore Evening in Paris.


My grandmommie's old jewelry box, with her hankies and mostly costume jewelry spilling out. I used pieces from both of my grandmothers. I purchased all the plates, saucers, and cups second hand. I admit to spending $3 on a little green saucer, but most everything else was not more than $1, with several pieces being even less. You can barely make out the favor I gave each woman at my table - a sweet silver heart bookmark. These cost about 50 cents to make and can be done in less than 1 minute. I promise to post directions and a link to where I found this great idea! PS If you enlarge this photo, don't worry about seeing something floating in the water pitcher. It's just edible violets I picked from my yard in the spring and then froze into ice cubes.

Mints leftover from Miss M's tea party - they have been in the freezer since July! More about the mints here and the party here. I gifted our Pastor's wife with this little pedestal dish I made. There is another one not in this shot that I gave to the guest speaker. Curious to know how I made them? Check back soon!
Sara served two and half years in Nigeria and hosted this lovely table.

A spring themed table...

I seriously considered a candy table...so fun! Instead, I plan to do a cupcake theme next year!

So serene and calm...

Each hostess provides a favor for her guests and ladies at this table received a snowflake pattern fleece blanket!

My friend at add a few sprinkles did this elegant table using items from her husband's home country of Latvia.

There were several more equally lovely and creative tables, but I was unable to make my around the room and photos of all of them. The best part of the afternoon was hearing the speaker share about difficult times in her life when not only was she faithful to trust God, but He was faithful to His promises. What a blessing to hear someone who truly gives thanks to God in all things.

Thursday, October 22, 2009

Witches Shoe Party Favor

****WARNING**** Don't click on my photos to enlarge them! My poor magic marker coloring really shows up. Also, I did remove the big glob of glue off the toe after I took the pictures!

I saw this fun idea on a totally cute blog and had to try making one for Miss M's teacher. I was out of black card stock but refused to go to the hobby store because it has been raining buckets at my house today. I improvised and used a black magic marker on gray card stock. Also, I could have purchased some themed ribbon and probably some charms, but I used what I had! Other than getting a little high on the fumes, I think it turned out pretty good for a first attempt. I didn't make the liner either - just lazy I guess!
before assembly...
Next time though, I think I will try using glue dots - less drippy that way while you are waiting for it to dry - hence the baby clothespins. Also, my pictures don't show the cute little tag that a bushel and a peck added. I took her suggestion and it just ups the cuteness factor by about 50%. It says:
Trick or Treat
Witches Feet
Mrs. XXXXX can't be beat!
Happy Halloween!
If you like this idea, be sure to go here for a shoe template. Not sure who the original idea came from, but it really is precious and could easily be adapted for other themes. It would make a great favor for a princess party, don't you think?


Wednesday, October 21, 2009

Neighborhood Boo Game


Have you ever been boo'd? Not like at a sporting event, but with a surprise treat left at your doorstep by a sneaky neighbor? This game went around my parent's neighborhood several years ago and I decided to have the wee ones help me play in our neck of the woods. (OK, not woods but more like metropolitan area....)
The basics of the game are as follows:
  • Prepare a few treats for neighbors. (We did 6 since we are starting the game.)
  • Leave at their doorstep with a Boo note and directions. You can google boo game for ideas or I can email you a copy of the one we used.
  • The neighbors are instructed to hang the boo sign from a front window or door.
  • They also have two days in which to make two copies of the note and leave it with treats for two neighbors who haven't been boo'd yet.
That's it! We did some assorted Halloween candy for neighbors we don't know very well, homemade sugar cookies for the ones we do know, and a mug with teas for our diabetic neighbor. You could also do a single sunflower ($1 each at my grocery store this week!), a small potted mum, apple cider, even just some crisp apples!
We got caught by a few neighbors, but it was still fun! My battery was low so I didn't get any pics of the delivery, but here is what a few of the goodies looked like.

The poem I found to use reads like this, but if you e-mail me a request, I will send you the entire document with a friendly ghost, poem, and directions! A friend from church suggested including a halloween tract which made me think about including an invite to your church fall fest! I also thought that classrooms could do it within a school. If you boo your neighborhood, let me know how it goes!

Boo!
To our good friends on the street;
Our homes location made us meet.
You now have been Boo'd, but who would we be?

We'll never tell, it's a secret, you see.
We placed these goodies for you and yours;
Then we ran away fast, after knocking on the door!
Happy Halloween


Wednesday, October 14, 2009

Frugal Fall Fancies

UPDATED: I finally investigated the giant acorns a bit. They come from the burr oak tree and I found a site selling them in packs of five for $5 - AND they were sold out! Just look how much cash I have sitting in that bowl! And I have more in the basement....oh well, maybe next year!

How's that for an alliteration? I finally dug around in the basement and found the last of my October decorations. I will switch things up just a bit when I put away the Halloween things, but most everything will stay as is. So here goes with a few easy and very inexpensive ways to decorate your home.I found these GIANT acorn things under a tree at the local municipal airport my folks use when my dad flies in for a visit. I would hate to see the squirrel that eats these things! I usually put a few drops of cinnamon oil on a cotton ball and bury it under the acorns. The bowl is from my great-grandmother's dishes. After Thanksgiving, I just store them in a gallon ziplock.As you can see, the wee ones had to jump in a shot...all their idea, nice huh?

Next up - an idea that is as old as the hills, but you would be surprised at how many people don't do this simple centerpiece. I picked up my container several years ago off a sale table at a local craft/floral store. I use it with many different items throughout the year, usually with candy! My friends and family know NEVER eat the candy in the centerpiece! (Even Mr C already knows this!) I have had this candy corn for at least 7 years. I just put it in a ziplock at the end of the season and store it with my other Halloween decorations. Yes, sometimes the candy sticks to itself. I just break it up with my hands! I KNOW that candy corn isn't that expensive but I watch EVERY penny folks!

Next up...layered candle holders. So easy that your little ones could help you - unless they run the risk of sticking things up their nose! (Fortunately, that has not happened at my house yet.) Just buy a variety of dried beans, peas, and popcorn and layer them in a way that is pleasing to you. You can use any clear glass container. My mom has a really cool square one that she uses on her kitchen table. I wanted a variety of sizes so I choose two sizes of mason jars and a "flowerpot" candle holder. Nestle in a tea light and you have natural beauty in the daylight...
and all lit up at night! To store them, I put the small one and all its contents into a baggie. For the larger ones, I use a ring and lid to keep things nice and tight. No worries about any little creatures getting through the metal and glass!
Cupcake Daddy and Miss M just got home from AWANA and I need to hustle her in bed quickly! Thursday mornings are ROUGH at our house!

LinkWithin

Related Posts with Thumbnails